JavaFX 设计安全工具
0 条评论前言
近期要使用JavaFX开发exp小工具,这里记录下学习过程。
安装
我的环境是Mac+java1.8+idea
1、创建javaFX项目
首先file->newProject->javaFX 然后一直默认即可,这里注意,最新版的javaFX使用的是11版本,我们先在idea上选择jdk为11,后续编译的时候换回来即可。
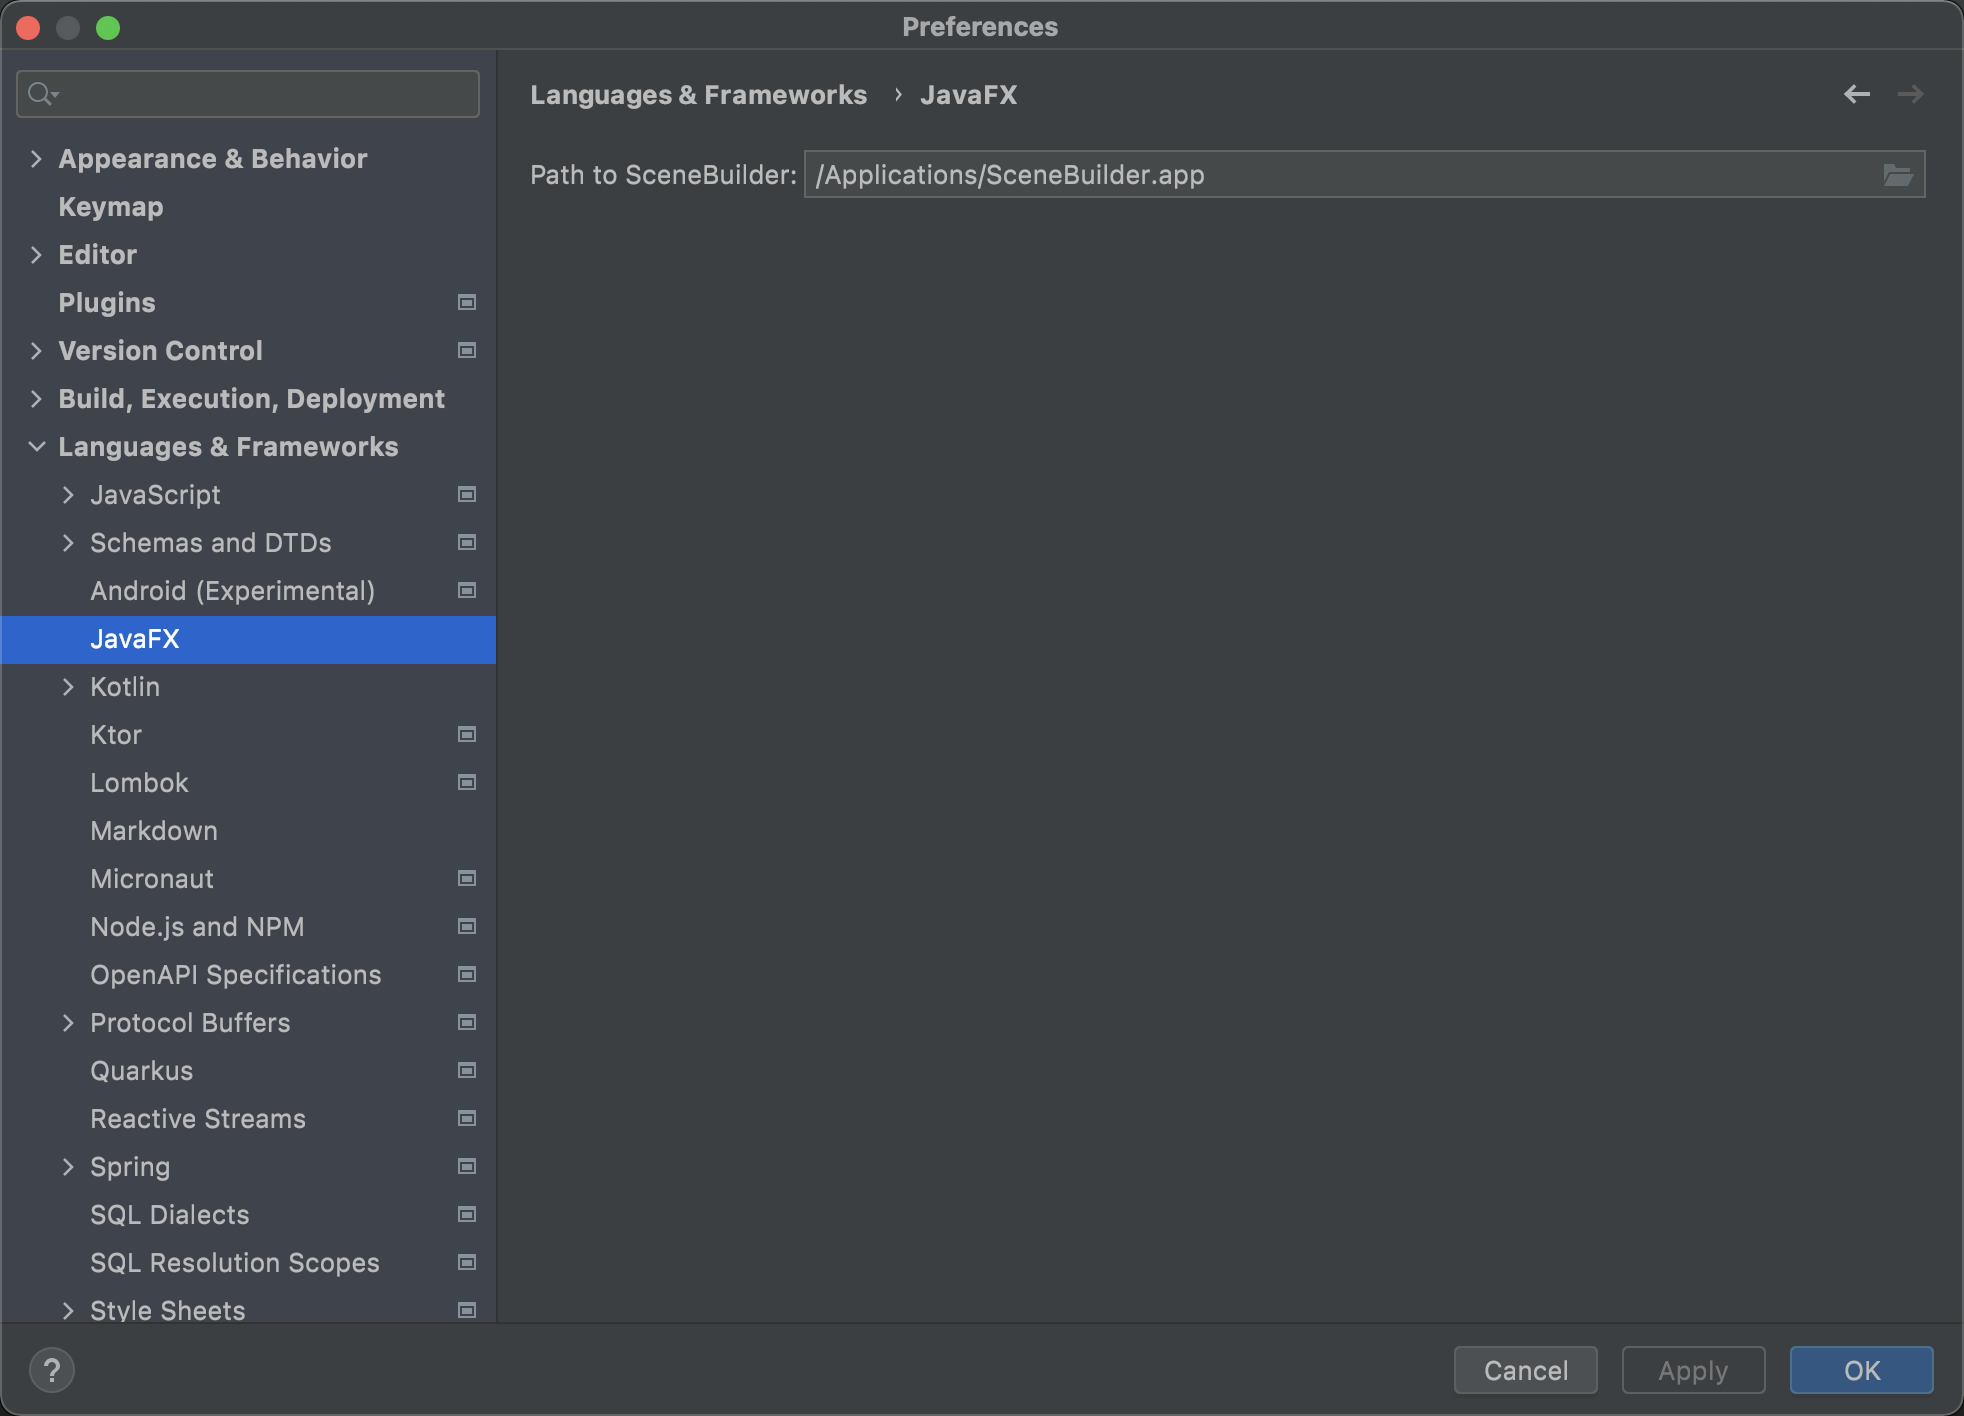
2、安装SceneBuilder
https://www.oracle.com/java/technologies/javafxscenebuilder-1x-archive-downloads.html
选择自己想要安装的版本,默认安装即可。
然后在idea的Preference中在javaFX中添加路径即可。
编译
1、先将编译版本改为8,详细如下
https://zhuanlan.zhihu.com/p/348660719
2、该pom中的编译项如下
    <build>
        <plugins>


            <plugin>
                <groupId>org.apache.maven.plugins</groupId>
                <artifactId>maven-jar-plugin</artifactId>
                <version>3.1.0</version>
                <configuration>
                    <archive>
                        <!--自动添加META-INF/MANIFEST.MF -->
                        <manifest>
                            <addClasspath>true</addClasspath>
                        </manifest>
<!--                        添加运行的主类-->
                        <manifestEntries>
                            <Main-Class>com.lvyyevd.hwscan.MainApplication</Main-Class>
                        </manifestEntries>
                    </archive>
                </configuration>
            </plugin>
            <plugin>
                <groupId>org.apache.maven.plugins</groupId>
                <artifactId>maven-compiler-plugin</artifactId>
                <version>3.8.1</version>
                <configuration>
<!--                     修改编译版本-->
                    <source>8</source>
                    <target>8</target>
                </configuration>
            </plugin>
            <plugin>
                <groupId>org.openjfx</groupId>
                <artifactId>javafx-maven-plugin</artifactId>
                <version>0.0.7</version>
                <executions>
                    <execution>
                        <!-- Default configuration for running with: mvn clean javafx:run -->
<!--                        <id>default-cli</id>-->
                        <configuration>
                            <mainClass>com.lvyyevd.hwscan.MainApplication</mainClass>
                        </configuration>
                    </execution>
                </executions>
            </plugin>
        </plugins>
    </build>
然后mvn clean install就可以了
Demo
首先创建一个入口类
我的如下:
public class MainApplication extends Application {
private Stage primaryStage;
private BorderPane rootLayout;
@Override
public void start(Stage primaryStage) {
this.primaryStage = primaryStage;
this.primaryStage.setTitle("AddressApp");
initRootLayout();
// showPersonOverview();
}
/**
* Initializes the root layout.
*/
public void initRootLayout() {
try {
// Load root layout from fxml file.
FXMLLoader loader = new FXMLLoader();
loader.setLocation(MainApplication.class.getResource("view/main/RootLayout.fxml"));
rootLayout = (BorderPane) loader.load();
// Show the scene containing the root layout.
Scene scene = new Scene(rootLayout);
primaryStage.setScene(scene);
primaryStage.show();
} catch (IOException e) {
e.printStackTrace();
}
}
public static void main(String[] args) {
launch(args);
}
}
模仿自带的即可,view/main/RootLayout.fxml为你自己编写的fxml文件。
选择漏洞并动态加载UI
布局
可以参考下面
https://blog.csdn.net/Dream_Weave/article/details/119642184
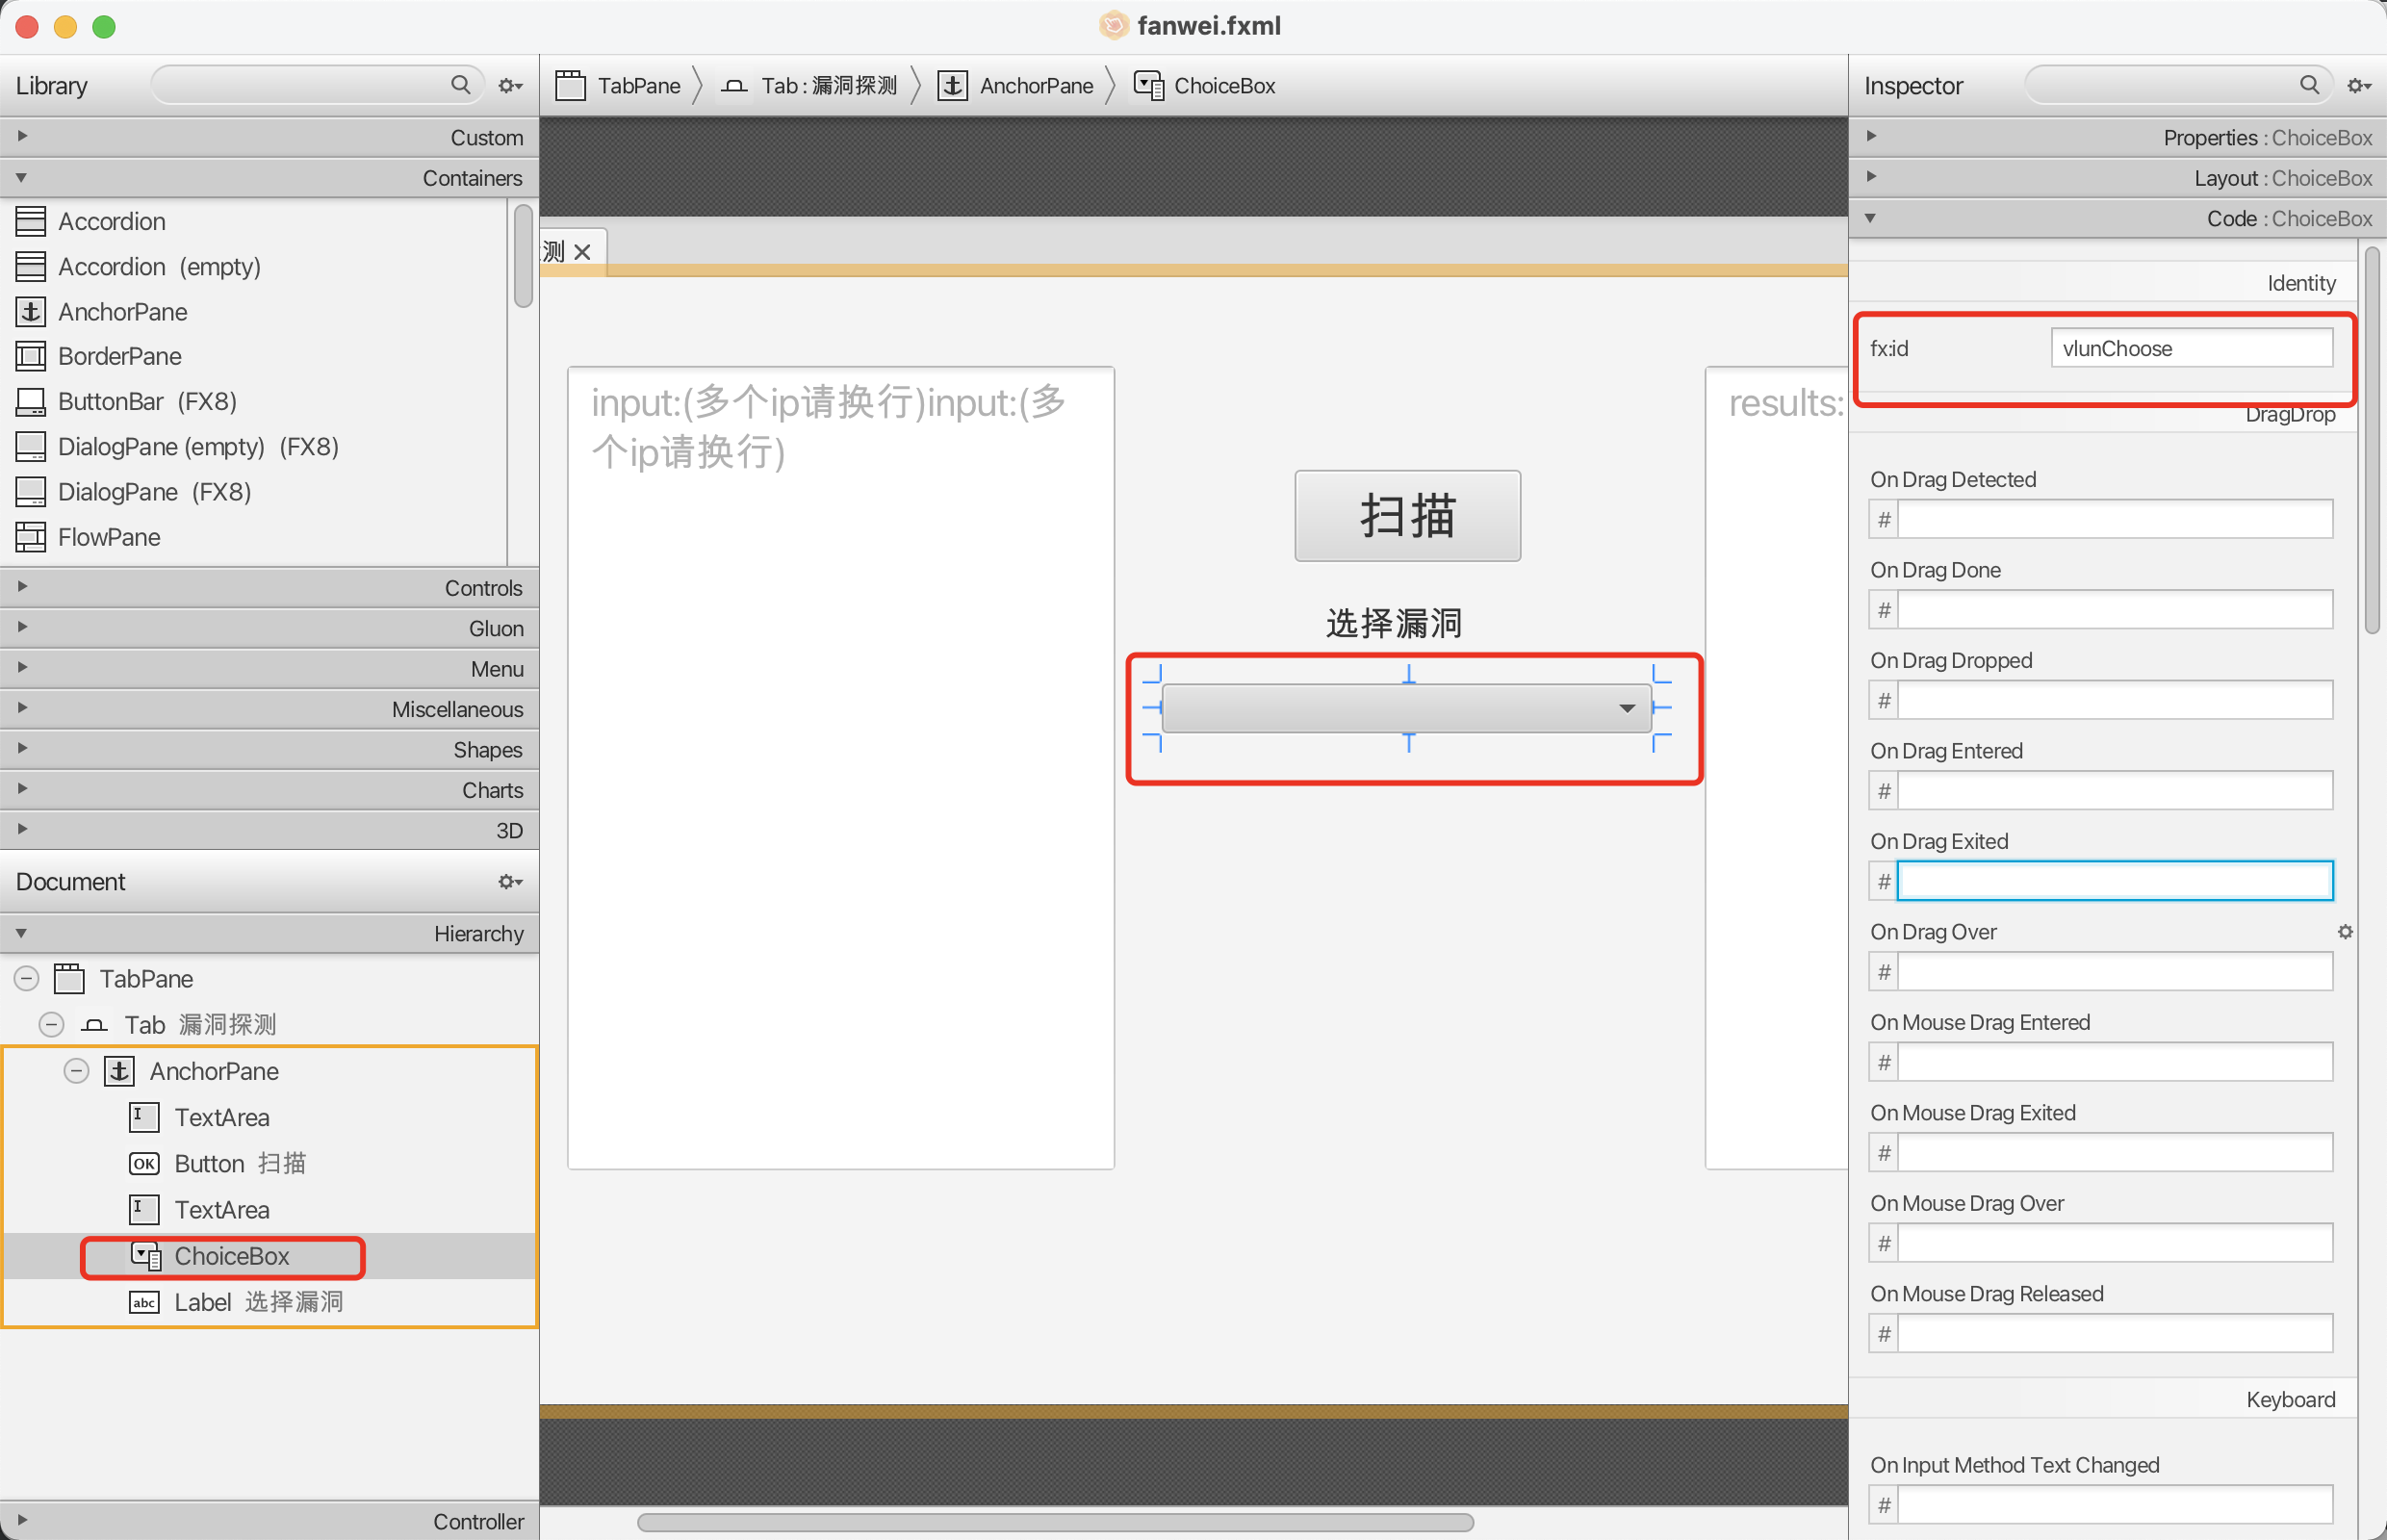
1、我需要创建一个下拉菜单,然后给他初始化一个值,
在相应的controller下用@FXML 标记一个私有变量:
 @FXML
    private ComboBox vlunComboBox2;
然后在sceneBuilder中联系起来,如下:
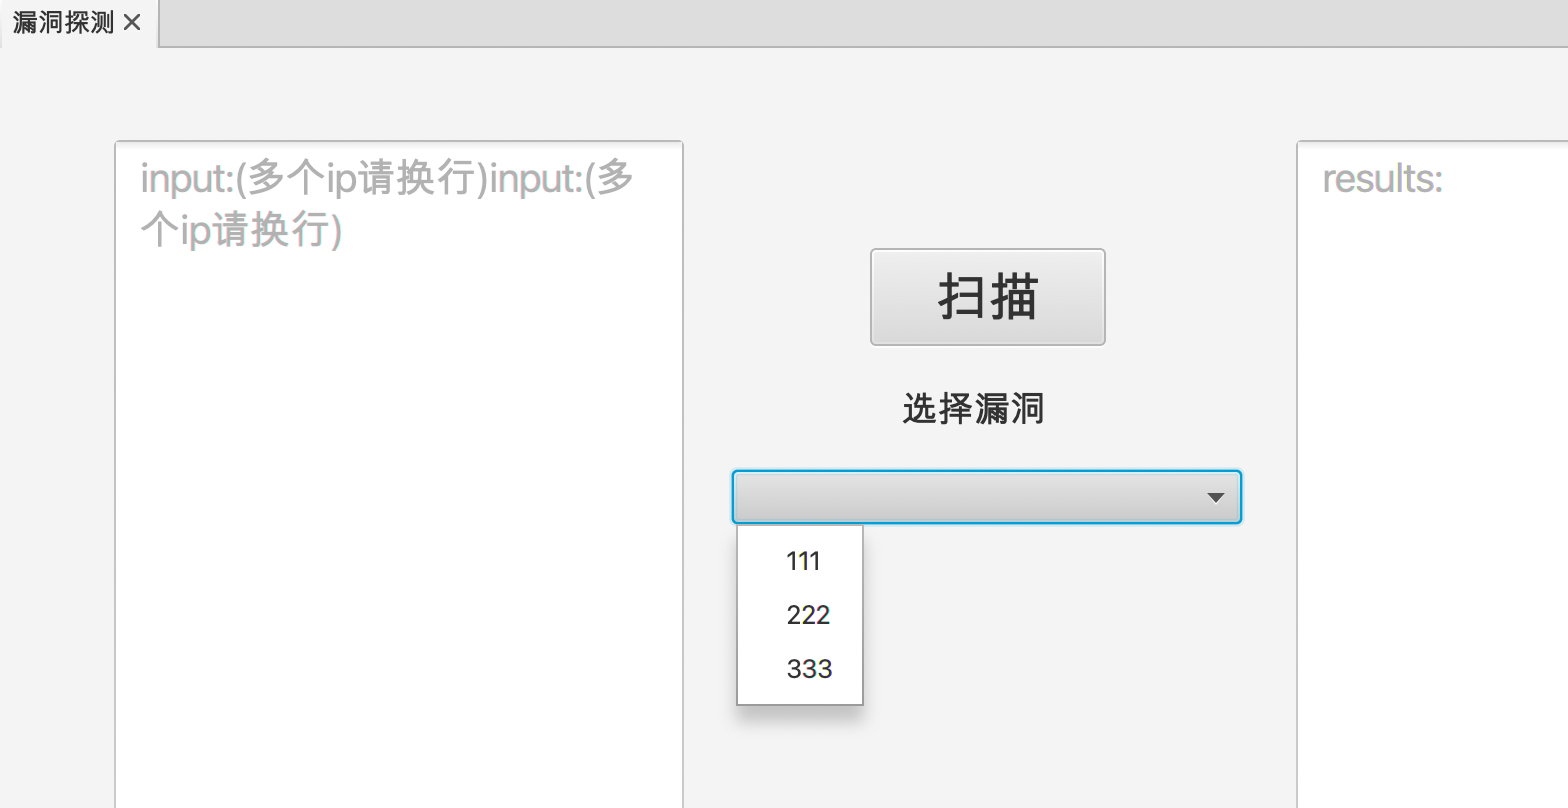
然后在controller中 编写初始化代码
@FXML
private  void initialize() {
    ObservableList<String> observableList = FXCollections.observableArrayList("111", "222", "333");
    vlunComboBox2.setItems(observableList);
}
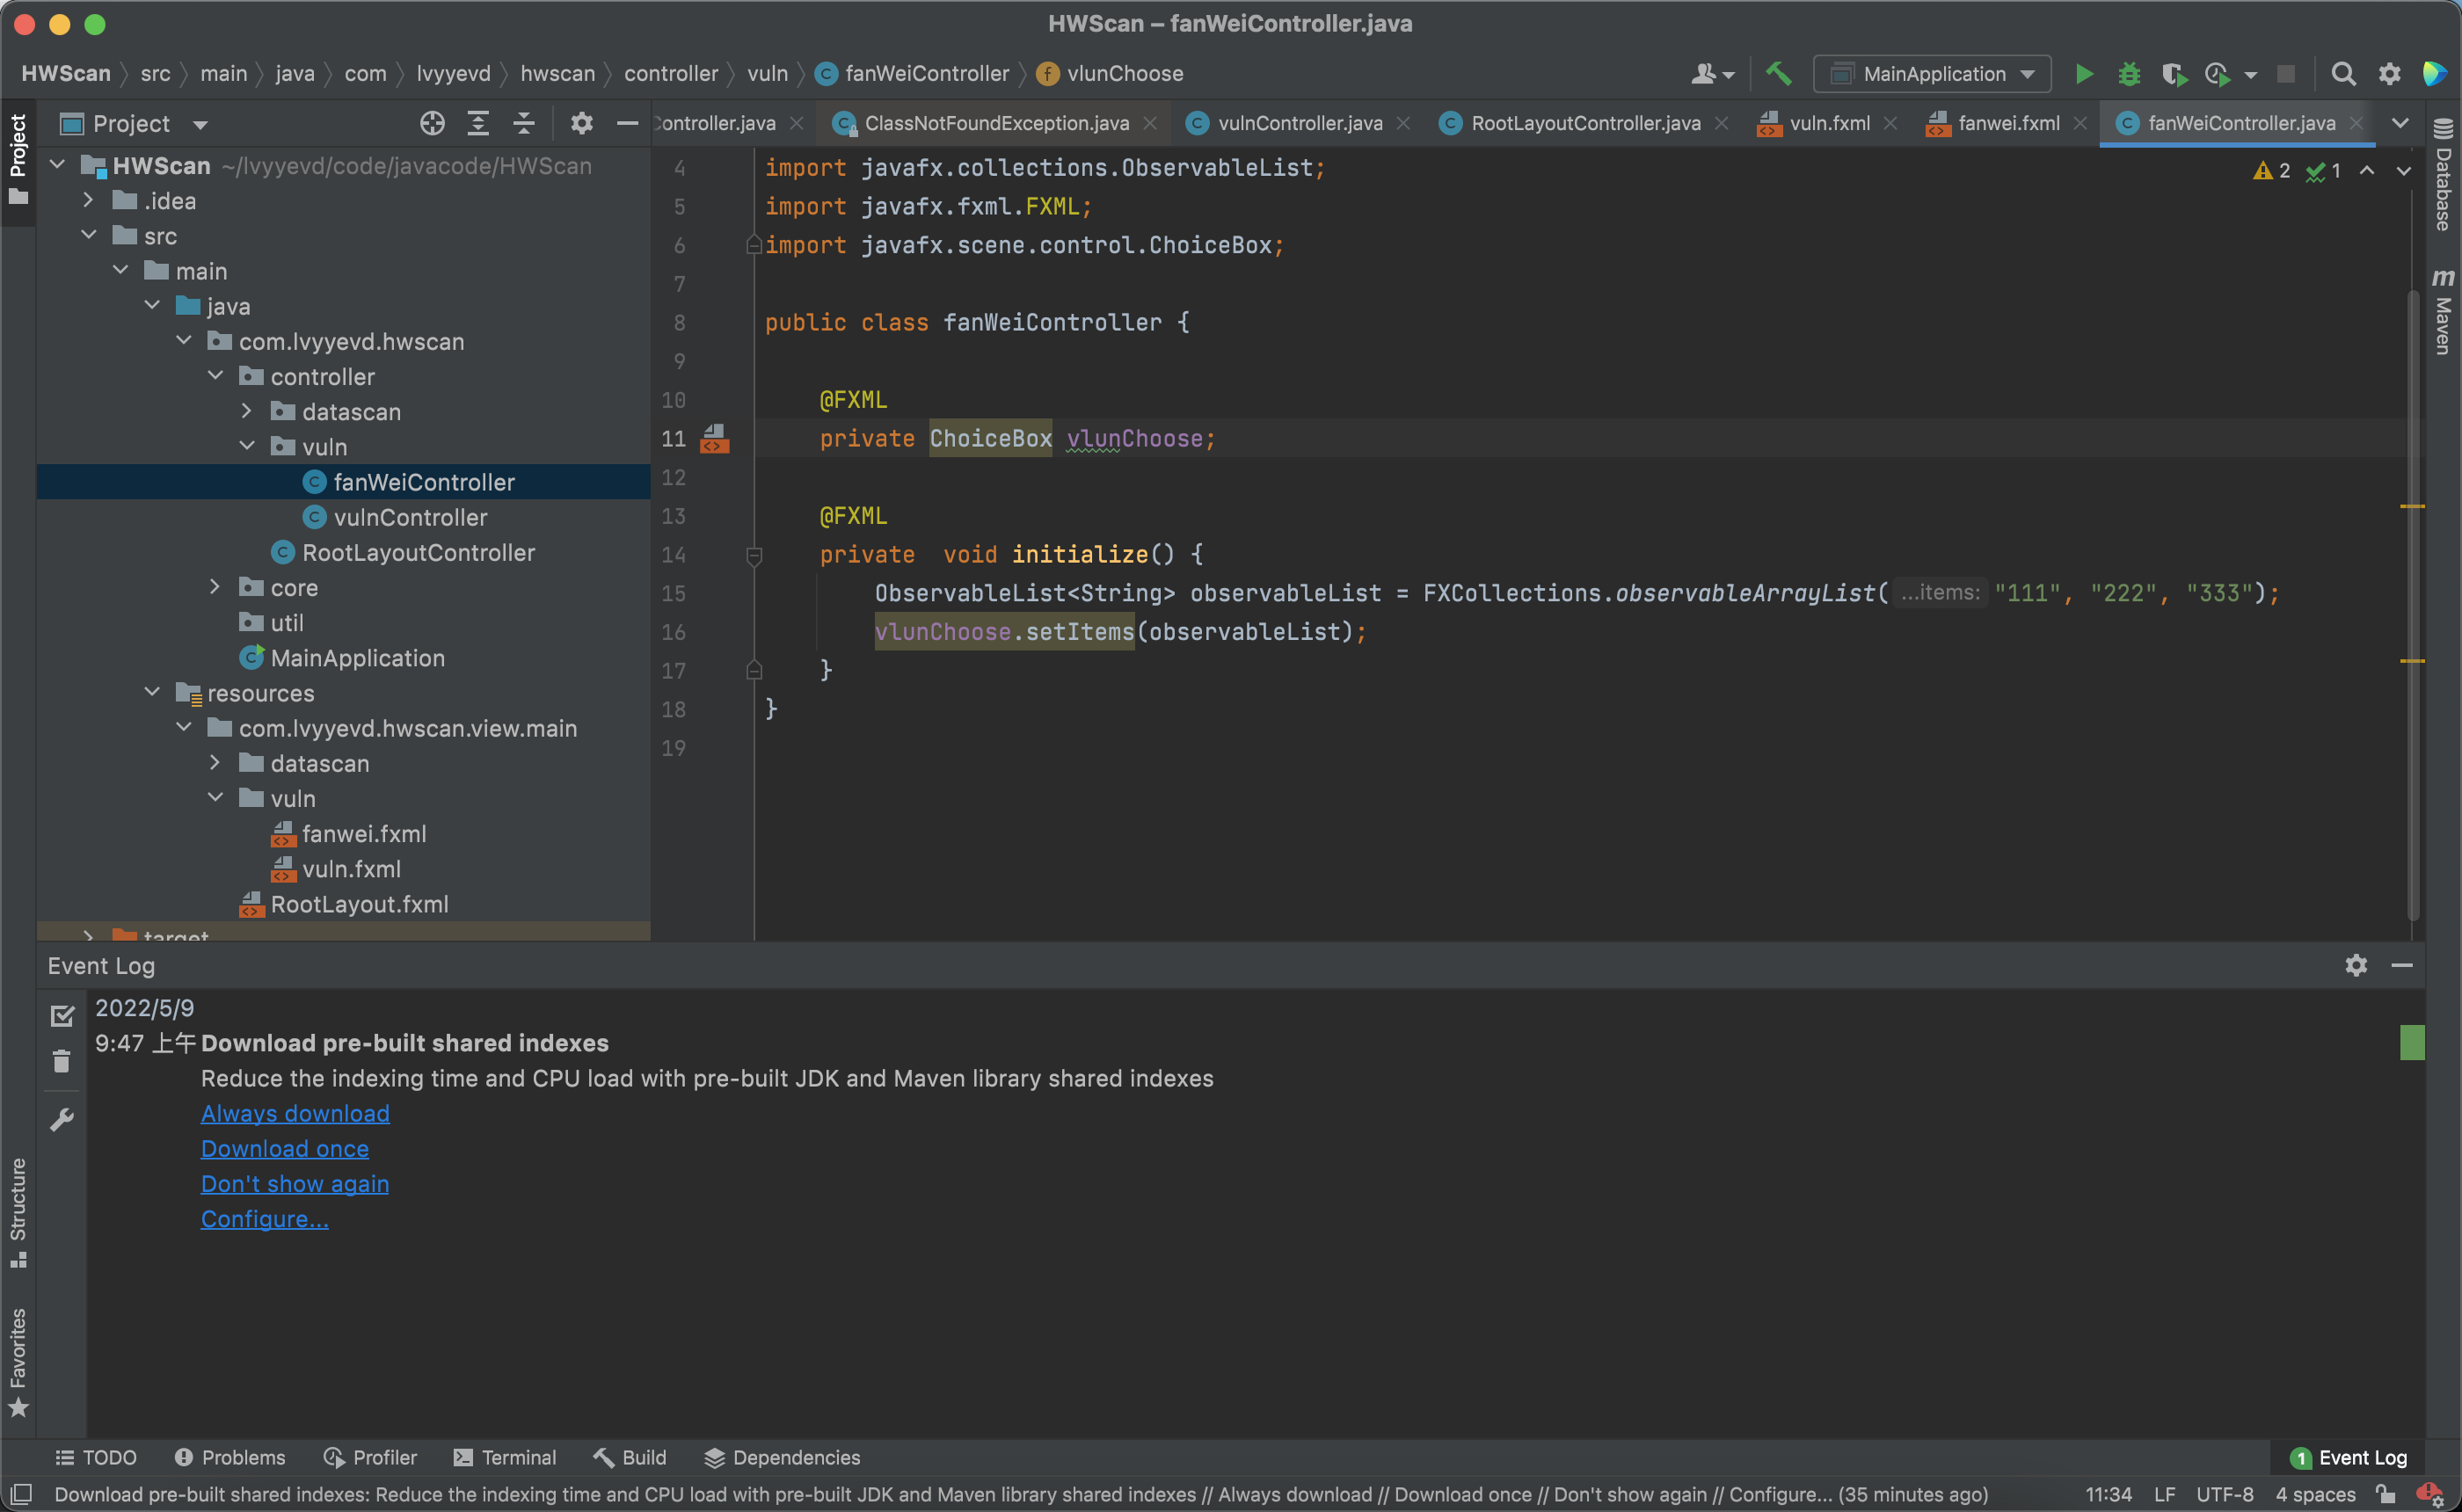
效果如下:
2、如何监听选择框里面的变化,可以使用监听器
编辑如下
    private  void initialize() {
        ObservableList<String> observableList = FXCollections.observableArrayList("All", "fanwei-8-sql");
        vlunComboBox1.setItems(observableList);
        vlunComboBox1.getSelectionModel().select(0);
        ObservableList<String> observableList2 = FXCollections.observableArrayList("fanwei-8-sql");
        vlunComboBox2.setItems(observableList2);


//        设置下拉框的监听器
        vlunComboBox2.getSelectionModel().selectedItemProperty().addListener(
                new ChangeListener<String>() {
                    @Override
                    public void changed(ObservableValue<? extends String> arg0, String old_str, String new_str) {
                        // getSelectedIndex方法可获得选中项的序号,getSelectedItem方法可获得选中项的对象
                                System.out.println(vlunComboBox2.getSelectionModel().getSelectedItem().toString());
                    }
                }
        );
}
3、如何动态的加载其他的fxml文件,可以如下:
vulnScene.getChildren().clear();
                               FXMLLoader loader = new FXMLLoader();
                               loader.setLocation(MainApplication.class.getResource("view/main/vuln/fanwei/fanwei_v9_fileupload.fxml"));
                               try {
                                   vulnScene.getChildren().setAll((TabPane)loader.load());
                               } catch (IOException e) {
                                   e.printStackTrace();
                               }
将所需的vulnScene 中的子节点 加载进所需的fxml文件。
效果如下:
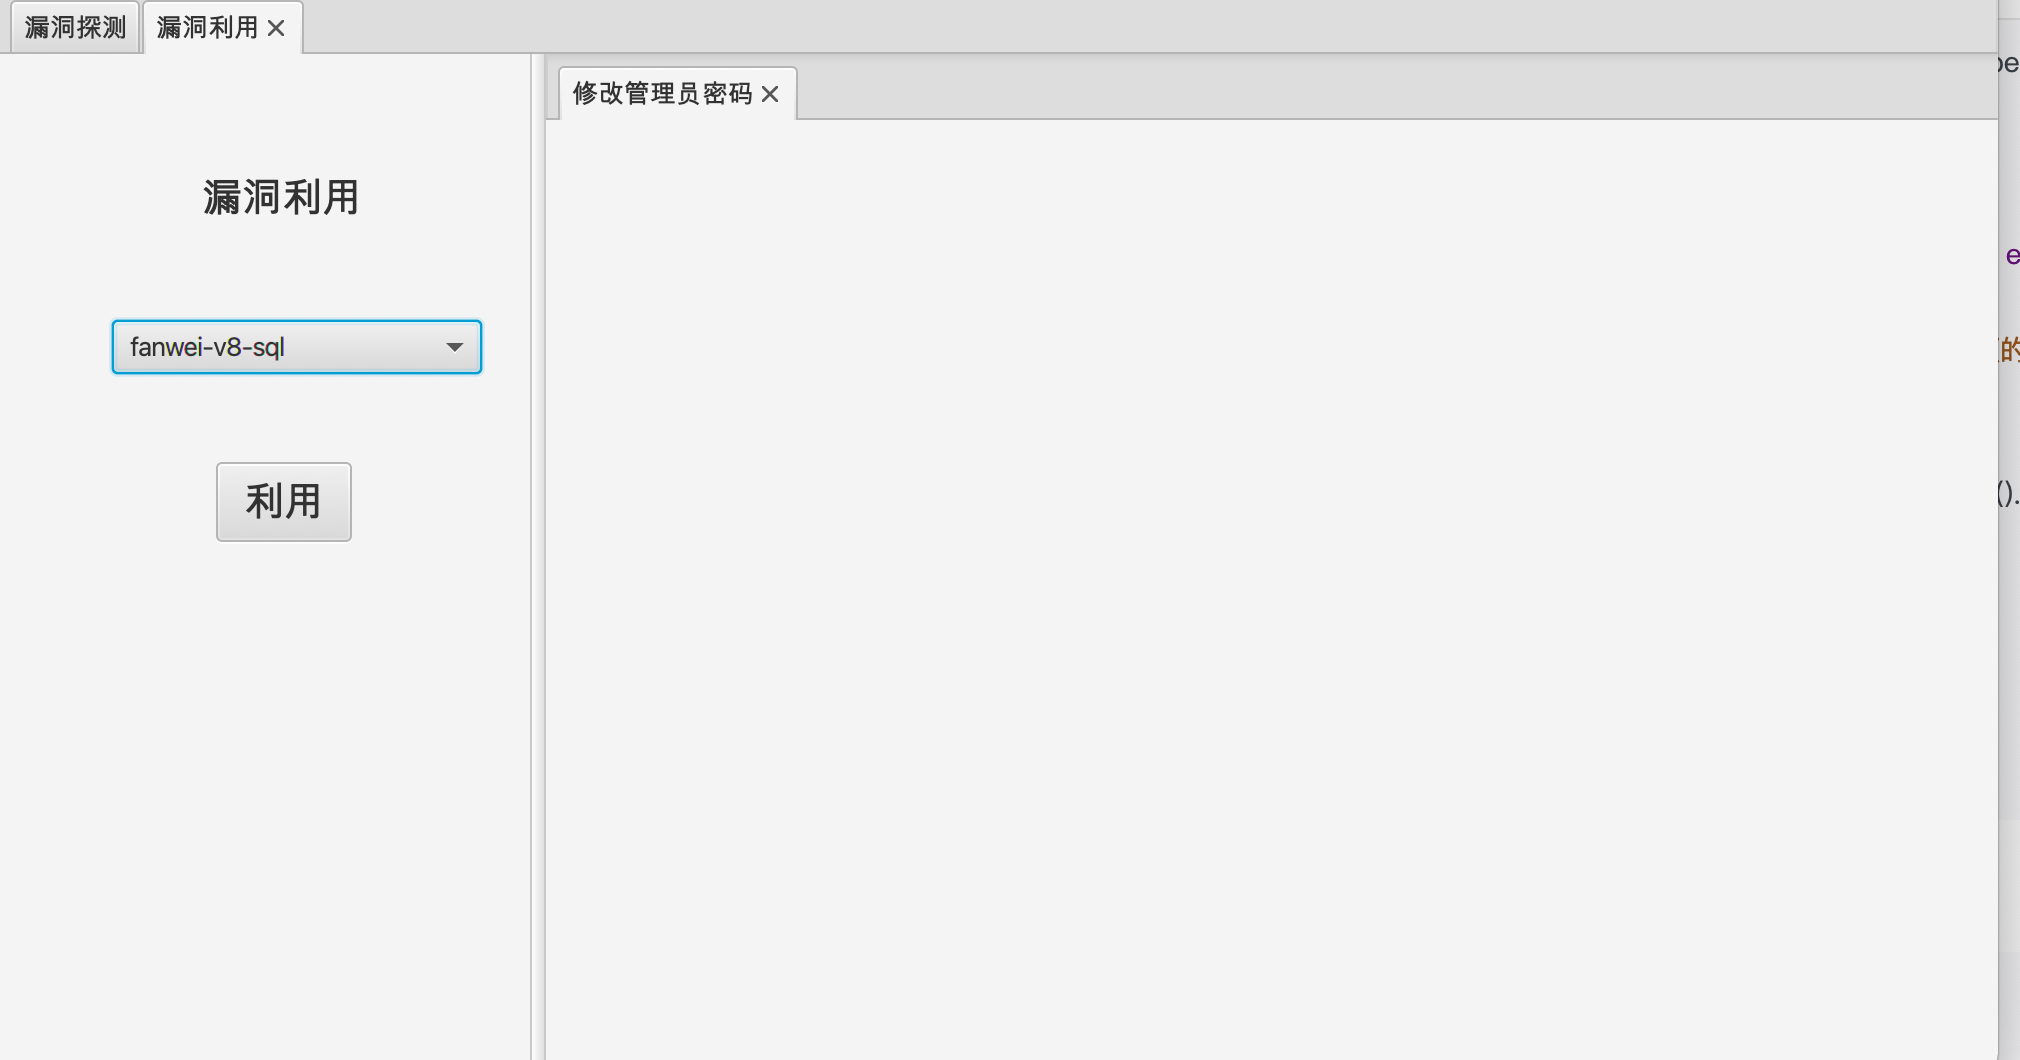
我们就可以根据选择的漏洞动态修改右边的展示界面了。
代理的实现
1、 点击添加代理弹出一个窗口
这个比较简单,在menu中的MenuItem中添加action
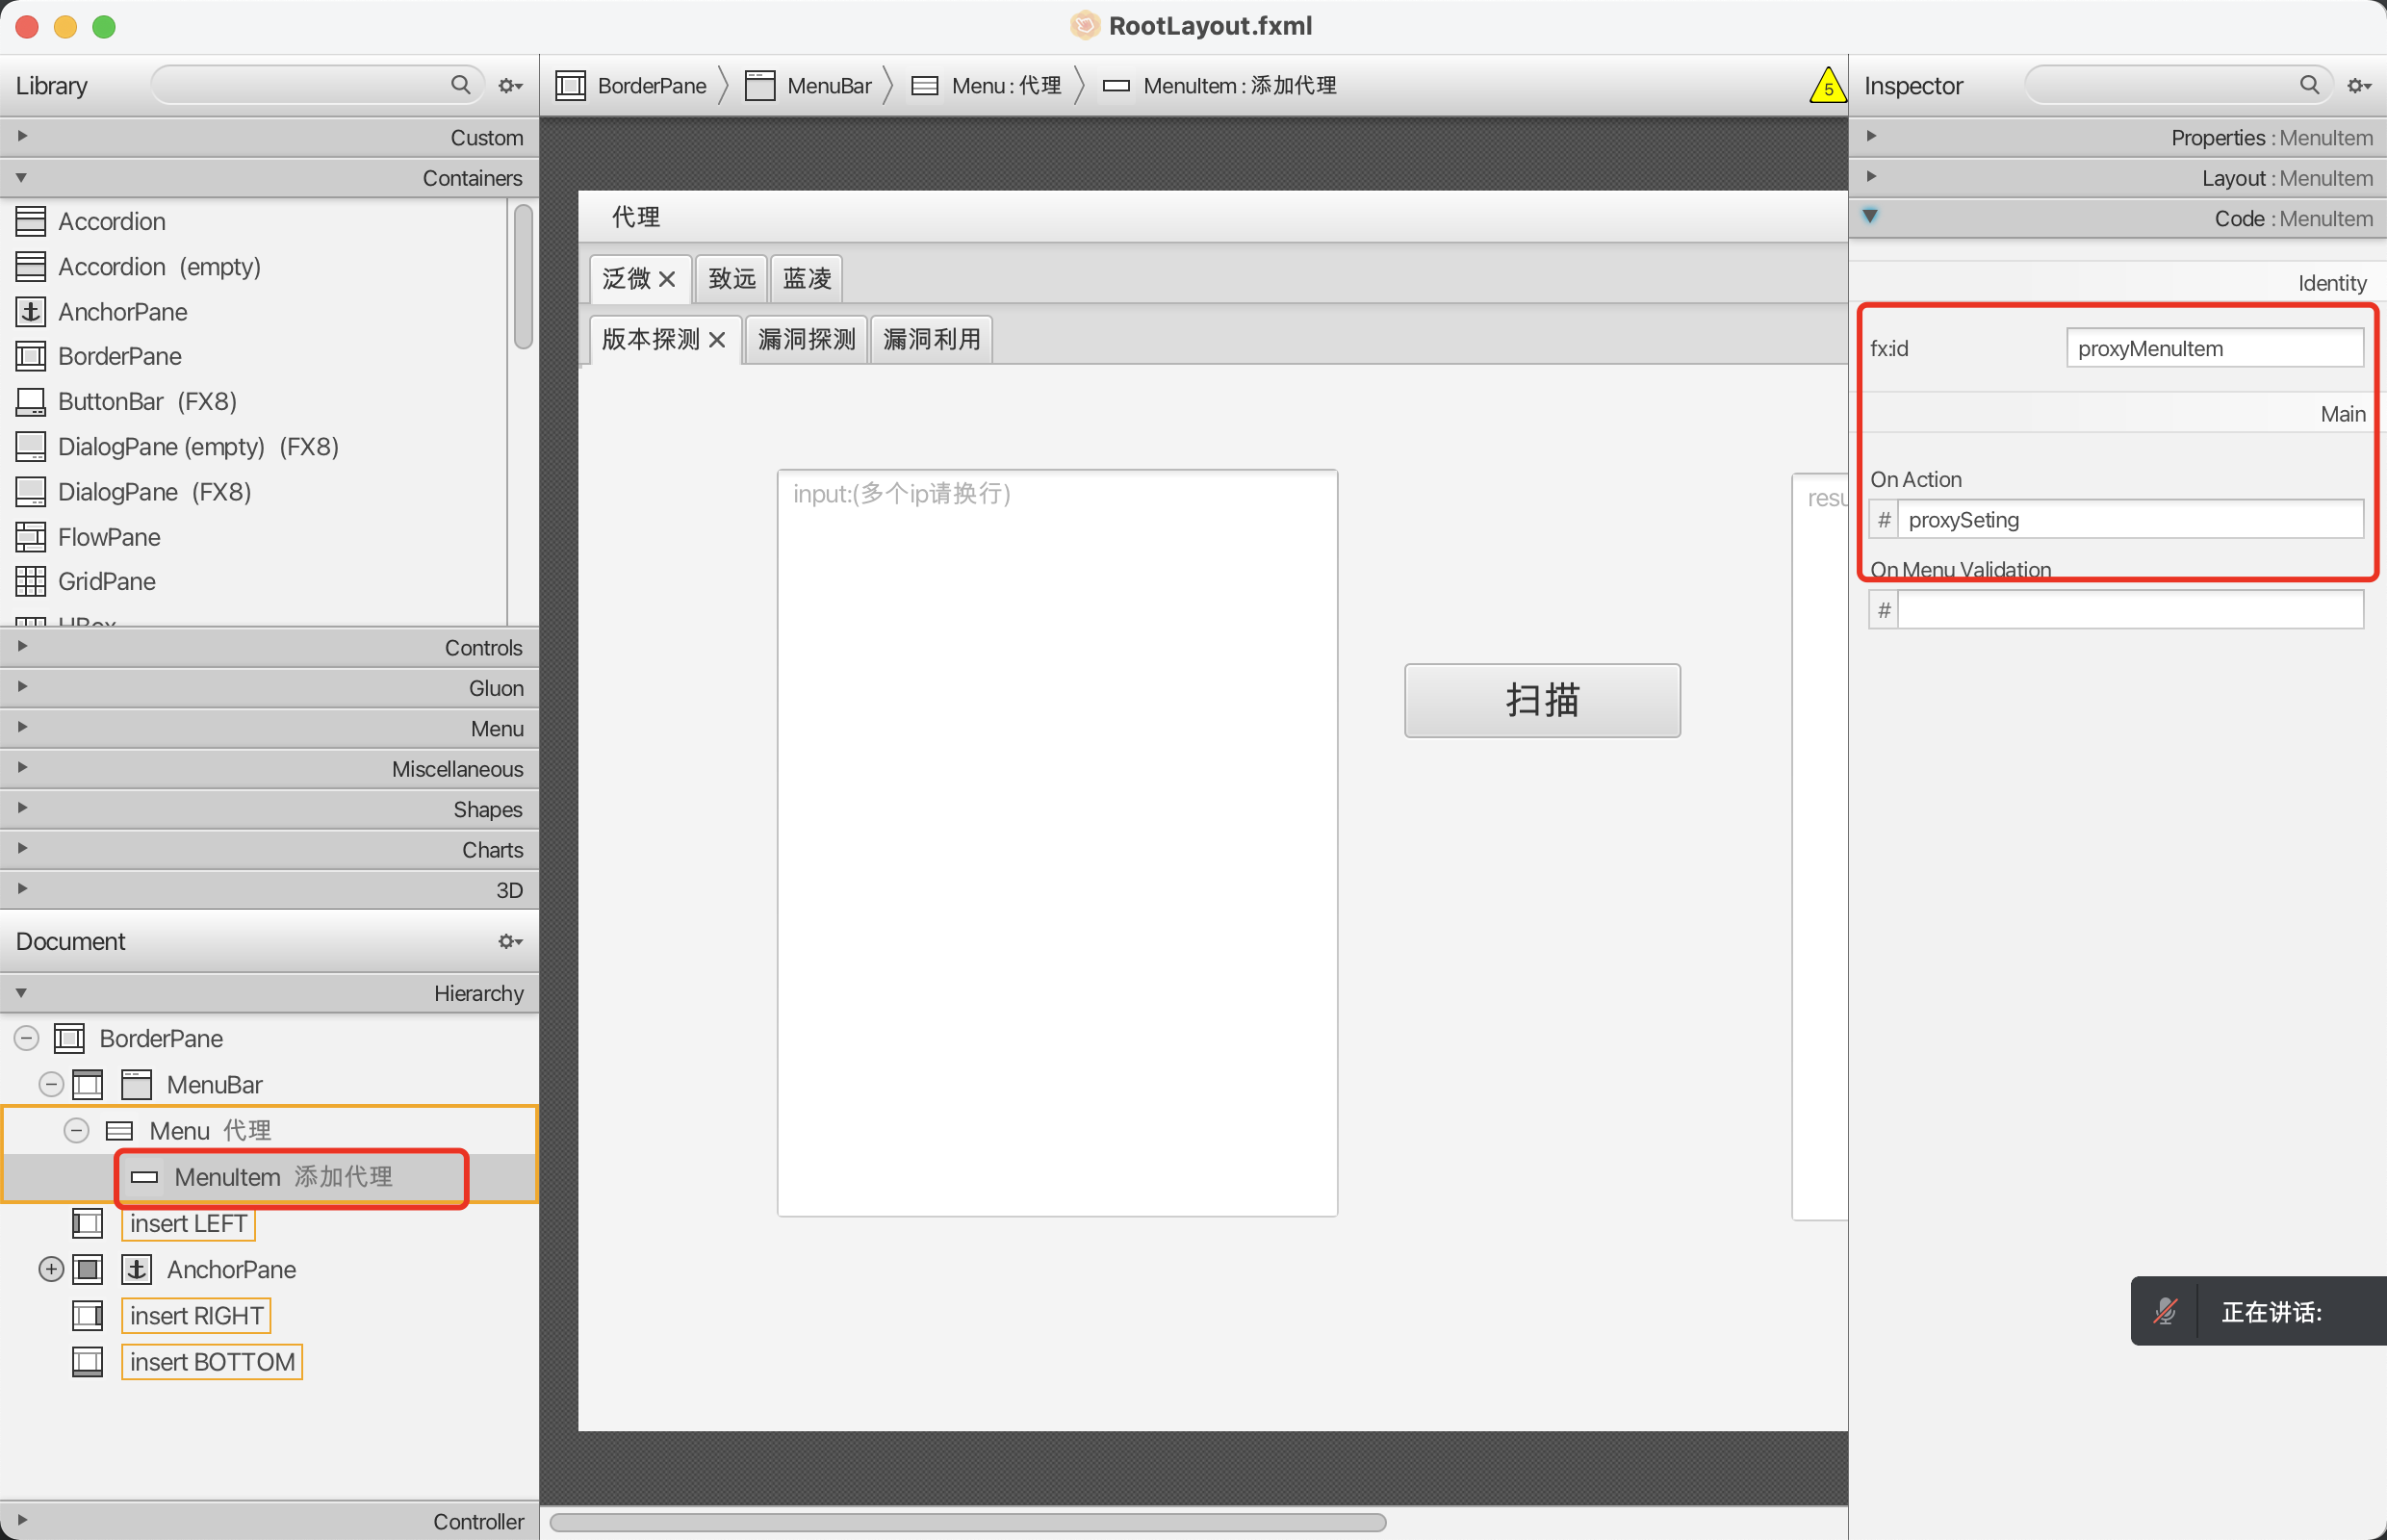
action如下:
 @FXML
    private void proxySeting() throws IOException {
        Stage stage = new Stage();
        Scene scene = new Scene((Parent) FXMLLoader.load(MainApplication.class.getResource("view/main/proxySetting.fxml")));
        stage.setScene(scene);
        stage.show();
    }
效果如下:

2、设置单选框与几个输入框,
这两个启用禁用按钮的属性是RadioButton,从sceneBuilder中拖出来就可以了。要设置成互斥属性可以如下配置:
分别将启用和禁用的RadioButton的fixId设置成enableRadioButton与disableRadioButton,然后如下:
    @FXML
    private  void initialize() {
        ToggleGroup tg = new ToggleGroup();
        enableRadioButton.setToggleGroup(tg);
        disableRadioButton.setToggleGroup(tg);
      //设置disableRadioButton默认为选择。
        disableRadioButton.setSelected(true);
    }
便实现了上图的效果。
输入框的属性是TextField,直接拖拽,再在左边加上label显示即可。
3、设置取消与保存按钮
取消按钮就是关闭当前窗口,可以如下设置action:
@FXML
    private void cancelAction(){
        Stage stage = (Stage)cancelButton.getScene().getWindow();
        stage.close();
    }
保存就是将当前信息保存下来,这里我设置了一个静态类,好让全局访问。
public class httpProxy {
    public static Boolean enabel = false;
    public static String ip = "127.0.0.1";
    public static Integer port = 8080;
    public static String username = "";
    public static String password = "";

    public static void proxySetting(Boolean enabel,String ip,Integer port,String username,String password){
        httpProxy.enabel = enabel;
        httpProxy.ip = ip;
        httpProxy.port = port;
        httpProxy.username = username;
        httpProxy.password = password;
    }
}
接下来就是实现代理了,
我这里使用的是httpok,pom里面添加
<dependency>
            <groupId>com.squareup.okhttp3</groupId>
            <artifactId>okhttp</artifactId>
            <version>4.9.3</version>
        </dependency>
写了一个简单的demo如下
    public static String get(String url) throws IOException {
        OkHttpClient client = new OkHttpClient();
        Request request = new Request.Builder().url(url).build();
        Response response = client.newCall(request).execute();
        if (response.isSuccessful()) {
            return response.body().string();
        } else {
            throw new IOException("Unexpected code " + response);
      }
可以实现httpget请求,但这肯定是不满足要求的,我们需要添加代理,以及可以添加header参数等等要求,httpok是可以添加Interceptor的,这个可以让我们在发请求的时候在里面添加参数,在网上搜了一个挺好用的类,
package com.lvyyevd.hwscan.util.httpInterceptor;

import okhttp3.*;
import okio.Buffer;

import java.io.File;
import java.io.IOException;
import java.util.*;

public class BasicParamsInterceptor implements Interceptor {

    Map<String, String> queryParamsMap = new HashMap<>(); // 添加到 URL 末尾,Get Post 方法都使用
    Map<String, String> paramsMap = new HashMap<>(); // 添加到公共参数到消息体,适用 Post 请求
    Map<String, String> headerParamsMap = new HashMap<>(); //


    // 私有构造器
    public BasicParamsInterceptor() {}

    @Override
    public Response intercept(Chain chain) throws IOException {

        Request request = chain.request();
        Request.Builder requestBuilder = request.newBuilder();
//
//        // process header params inject
//        Headers.Builder headerBuilder = request.headers().newBuilder();
        // 以 Entry 添加消息头
        if (headerParamsMap.size() > 0) {
            Iterator iterator = headerParamsMap.entrySet().iterator();
            while (iterator.hasNext()) {
                Map.Entry entry = (Map.Entry) iterator.next();
                requestBuilder.addHeader((String) entry.getKey(), (String) entry.getValue());
            }
        }

        // process queryParams inject whatever it's GET or POST
        if (queryParamsMap.size() > 0) {
            request = injectParamsIntoUrl(request.url().newBuilder(), requestBuilder, queryParamsMap);
        }

        // process post body inject
        if (paramsMap.size() > 0) {
            if (canInjectIntoBody(request)) {
                FormBody.Builder formBodyBuilder = new FormBody.Builder();
                for(Map.Entry<String, String> entry : paramsMap.entrySet()) {
                    formBodyBuilder.add((String) entry.getKey(), (String) entry.getValue());
                }

                RequestBody formBody = formBodyBuilder.build();
                String postBodyString = bodyToString(request.body());
                postBodyString += ((postBodyString.length() > 0) ? "&" : "") +  bodyToString(formBody);
                requestBuilder.post(RequestBody.create(MediaType.parse("application/x-www-form-urlencoded;charset=UTF-8"), postBodyString));
            }
        }

//        if(fileParamsMap.size()>0 || file !=null ){
//
//        }

        request = requestBuilder.build();
        return chain.proceed(request);
    }

    /**
     *  确认是否是 post 请求
     * @param request 发出的请求
     * @return true 需要注入公共参数
     */
    private boolean canInjectIntoBody(Request request) {
        if (request == null) {
            return false;
        }
        if (!request.method().equals("POST")) {
            return false;
        }
        RequestBody body = request.body();
        if (body == null) {
            return false;
        }
        MediaType mediaType = body.contentType();
        if (mediaType == null) {
            return false;
        }
        if (!mediaType.subtype().equals("x-www-form-urlencoded")) {
            return false;
        }
        return true;
    }

    // func to inject params into url
    private Request injectParamsIntoUrl(HttpUrl.Builder httpUrlBuilder, Request.Builder requestBuilder, Map<String, String> paramsMap) {
        if (paramsMap.size() > 0) {
            Iterator iterator = paramsMap.entrySet().iterator();
            while (iterator.hasNext()) {
                Map.Entry entry = (Map.Entry) iterator.next();
                httpUrlBuilder.addQueryParameter((String) entry.getKey(), (String) entry.getValue());
            }
            requestBuilder.url(httpUrlBuilder.build());
            return requestBuilder.build();
        }
        return null;
    }

    private static String bodyToString(final RequestBody request){
        try {
            final RequestBody copy = request;
            final Buffer buffer = new Buffer();
            if(copy != null)
                copy.writeTo(buffer);
            else
                return "";
            return buffer.readUtf8();
        }
        catch (final IOException e) {
            return "did not work";
        }
    }

    public static class Builder {

        BasicParamsInterceptor interceptor;

        public Builder() {
            interceptor = new BasicParamsInterceptor();
        }

        // 添加公共参数到 post 消息体
        public Builder addParam(String key, String value) {
            interceptor.paramsMap.put(key, value);
            return this;
        }

        // 添加公共参数到 post 消息体
        public Builder addParamsMap(Map<String, String> paramsMap) {
            interceptor.paramsMap.putAll(paramsMap);
            return this;
        }

        // 添加公共参数到消息头
        public Builder addHeaderParam(String key, String value) {
            interceptor.headerParamsMap.put(key, value);
            return this;
        }

        // 添加公共参数到消息头
        public Builder addHeaderParamsMap(Map<String, String> headerParamsMap) {
            interceptor.headerParamsMap.putAll(headerParamsMap);
            return this;
        }


        // 添加公共参数到 URL
        public Builder addQueryParam(String key, String value) {
            interceptor.queryParamsMap.put(key, value);
            return this;
        }

        // 添加公共参数到 URL
        public Builder addQueryParamsMap(Map<String, String> queryParamsMap) {
            interceptor.queryParamsMap.putAll(queryParamsMap);
            return this;
        }

        public BasicParamsInterceptor build() {
            return interceptor;
        }

    }
}
使用的时候初始化一下Builder,然后调用一下Builder的相应方法添加参数,再调用Builder的builder方法就返回一个interceptor了,具体想要实现的可以所需添加。
这里封装了一个get请求方式作为参考,
public class httpRequest {

    private X509TrustManager x509TrustManager() {
        final X509TrustManager x509TrustManager = new X509TrustManager() {
            @Override
            public void checkClientTrusted(X509Certificate[] x509Certificates, String s) throws CertificateException {
            }

            @Override
            public void checkServerTrusted(X509Certificate[] x509Certificates, String s) throws CertificateException {
            }


            @Override
            public X509Certificate[] getAcceptedIssuers() {
                return new java.security.cert.X509Certificate[]{};
            }
        };
        return x509TrustManager;
    }

    private SSLSocketFactory sslSocketFactory() {
        try {
            SSLContext sslContext = SSLContext.getInstance("TLS");
            sslContext.init(null, new TrustManager[] {x509TrustManager()}, new SecureRandom());
            return sslContext.getSocketFactory();
        } catch (NoSuchAlgorithmException e) {
            e.printStackTrace();
        } catch (KeyManagementException e) {
            e.printStackTrace();
        }
        return null;
    }

    public Response getHttpRequest(String url,  Map<String, String> headPargram) throws IOException {
        OkHttpClient client;
      //设置interceptor
        BasicParamsInterceptor interceptor = null;
        BasicParamsInterceptor.Builder builder = new BasicParamsInterceptor.Builder();
        //添加参数
        Map header = new HashMap<String,String>();

        header.put("User-Agent","Mozilla/5.0 (Macintosh; Intel Mac OS X 10.15; rv:100.0) Gecko/20100101 Firefox/100.0");
        builder.addHeaderParamsMap(header);
        if(!CollectionUtils.isEmpty((Collection<?>) headPargram)){
            builder.addHeaderParamsMap(headPargram);
        }

        //代理和非代理走不同的路

        if(httpProxy.enabel) {

            Proxy proxy = new Proxy(Proxy.Type.HTTP, new InetSocketAddress(httpProxy.ip, httpProxy.port));

            Authenticator proxyAuthenticator = new Authenticator() {
                @Override
                public Request authenticate(Route route, Response response) throws IOException {
                    String credential = Credentials.basic(httpProxy.username, httpProxy.password);
                    return response.request().newBuilder()
                            .header("Proxy-Authorization", credential)
                            .build();
                }
            };
//            Map headermap =  new HashMap<String,String>();
//            headermap.put("Proxy-Connection","Keep-Alive");

            interceptor = builder.build();
            client = new OkHttpClient.Builder()
                    .addInterceptor(interceptor)
                    .retryOnConnectionFailure(false)//是否开启缓存
//                .connectionPool(pool())//连接池
                    .connectTimeout(5L, TimeUnit.SECONDS)
                    .readTimeout(5L, TimeUnit.SECONDS)
                    .sslSocketFactory(sslSocketFactory(), x509TrustManager())
                    .proxy(proxy)
                    .proxyAuthenticator(proxyAuthenticator)
                    .authenticator(proxyAuthenticator)
                    .build();
        }else {
            interceptor = builder.build();
            client = new OkHttpClient.Builder()
                    .addInterceptor(interceptor)
                    .retryOnConnectionFailure(false)//是否开启缓存
//                .connectionPool(pool())//连接池
                    .connectTimeout(5L, TimeUnit.SECONDS)
                    .readTimeout(5L, TimeUnit.SECONDS)
                    .sslSocketFactory(sslSocketFactory(), x509TrustManager())
                    .build();
        }
        Request request = new Request.Builder().url(url).build();
        return  client.newCall(request).execute();

}
}
调用getHttpRequest函数即可,这样可以实现http与https的代理,效果如下:
后记
后面的功能根据需求添加即可,我这里做一个记录,后面有需求再添加。